이득우의 게임 수학
카메라 설정 값을 이용한 방법과 원근 투영 행렬을 이용한 방법에서 절두체 컬링이 잘 동작하는 것은 확인했지만, 가장자리에서 오브젝트가 갑자기 사라지거나 불쑥 생겨나는 현상이 있었다.
- 오브젝트의 위치를 이용해 절두체 내외부 판정을 하기 때문이다.
게임 오브젝트의 좌표가 절두체 외부에 있더라도, 메시가 차지하는 영역이 절두체와 겹친다면 그려줘야 한다.
게임 엔진은 메시가 차지하는 영역을 효과적으로 관리하기 위해 구(Sphere)나 박스(Box) 같은 원시 도형(Primitive shape)을 사용하는데, 이러한 원시 도형으로 설정한 공간 데이터를 바운딩 볼륨이라고 한다.
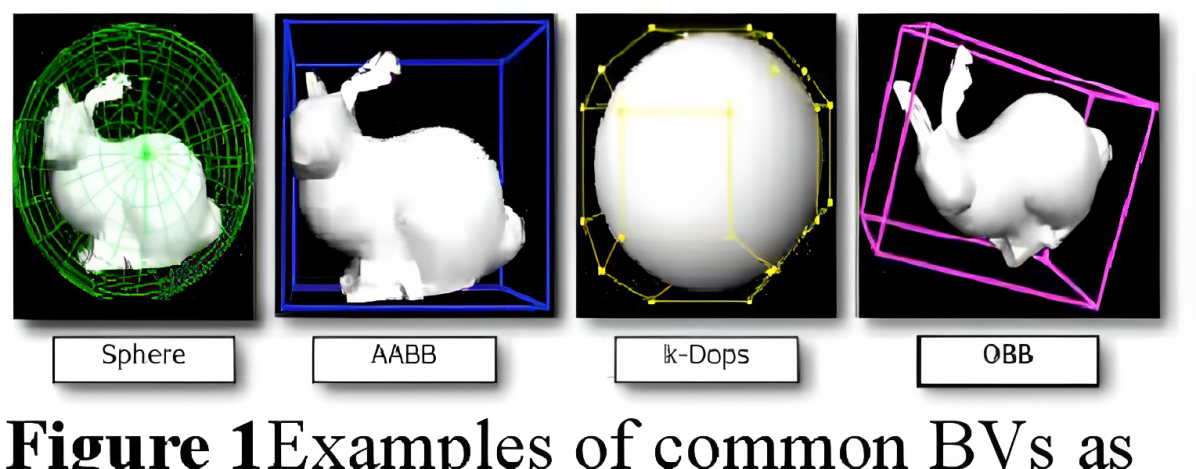
바운딩 볼륨에서 손쉽게 사용되는 원시 도형은 구다.
- 반지름을 통해 두 영역이 서로 겹치는지, 떨여져 있는지 가장 쉽게 파악할 수 있기 때문이다.
구의 중심으로부터 점 P까지의 거리가 d일 때, 반지름과 비교한 결과는 다음과 같다.
r < d: 구 외부에 P가 있다.
r > d: 구 내부에 P가 있다.
r = d: 구 표면에 P가 있다.
두 구의 중점 간의 거리를 d라고 할 때, 반지름의 합과 비교한 결과는 다음과 같다.
r₁ + r₂ < d: 두 구가 겹치지 않는다.
r₁ + r₂ > d: 두 구가 겹친다.
r₁ + r₂ = d: 두 구가 붙어 있다.
책의 예제인 CK 소프트렌더러에는 구가 다음과 같이 정의되어 있다.
// 책의 예제인 CK소프트렌더러에 정의된 구
struct Sphere
{
public:
    FORCEINLINE constexpr Sphere() = default;
    FORCEINLINE constexpr Sphere(const Circle& InCircle) : Center(InCircle.Center), Radius(InCircle.Radius) {};
    Sphere(const vector<Vector3>& InVertices);

    FORCEINLINE constexpr bool IsInside(const Vector3& InVector) const
    {
        return ((Center - InVector).SizeSquared() <= (Radius * Radius));
    }

    FORCEINLINE constexpr bool Intersect(const Sphere& InCircle) const
    {
        float radiusSum = Radius + InCircle.Radius;
        return (Center - InCircle.Center).SizeSquared() <= (radiusSum * radiusSum);
    }

    Vector3 Center = Vector3::Zero;
    float Radius = 0.f;
};
메시 정보로부터 바운딩 볼륨인 구 영역을 생성하는 부분은 다음과 같다.
- 모든 점 위치의 평균 좌표를 구한 후, 중점(평균 좌표)에서 가장 먼 점과의 거리를 구의 반지름으로 설정한다.
// 책의 예제인 CK소프트렌더러에서 메시 정보를 통해 구 바운딩 볼륨을 생성하는 부분
Sphere::Sphere(const vector<Vector3>& InVertices)
{
    size_t cnt = InVertices.size();
    if (cnt == 0)
    {
        return;
    }

    Vector3 sum;
    for (const auto& v : InVertices)
    {
        sum += v;
    }

    Center = sum / (float)cnt;

    Vector3 farthestPoint = (*max_element(InVertices.begin(), InVertices.end(),
    [&](Vector3 const& lhs, Vector3 const& rhs)
    {
        return (Center - lhs).SizeSquared() < (Center - rhs).SizeSquared();
    }));

    Radius = (farthestPoint - Center).Size();
}
메시 정보가 변경되지 않는 한 다시 계산할 필요가 없으므로, 메시 데이터 생성 시 처음 한 번만 생성해주면 된다.
// 책의 예제인 CK소프트렌더러에서 리소스를 불러오는 부분
bool GameEngine::LoadResources()
{
    ...

    // 메시의 바운딩 볼륨 생성
    cubeMesh.CalculateBounds();

    ...
}
메시에 구 바운딩 볼륨을 추가했다면, 반지름 정보를 활용해 메시 영역이 절두체 안쪽에 있는지, 겹치는지, 외부에 있는지 판별할 수 있다.

임의의 점 P(x₁, y₁, z₁)가 법선 벡터 n(a, b, c)과 d로 정의된 평면의 바깥쪽에 있는지 판별하는 수식은 다음과 같다.
- 절댓값을 취하면 평면으로부터 P까지의 거리가 된다.

위 식의 결괏값을 p, 바운딩 볼륨의 반지름을 r이라고 할 때, 이 값을 이용해 그려야 하는지에 대해 판별할 수 있다.
r < p: 구가 절두체 바깥에 있고 평면과 겹치지 않는다.
-r ≤ p ≤ r: 구가 절두체 바깥 혹은 안에 있고 평면과 겹친다.
-r > p: 구가 절두체 안에 있고 평면과 겹치지 않는다.
아래는 책의 예제인 CK소프트렌더러에서 구 바운딩 볼륨을 통해 절두체 컬링을 탐지하는 부분이다.
// 책의 예제인 CK소프트렌더러에서 구 바운딩 볼륨을 통해 절두체 컬링을 탐지하는 로직
FORCEINLINE constexpr BoundCheckResult Frustum::CheckBound(const Sphere& InSphere) const
{
    for (const auto& p : Planes)
    {
        if (p.Distance(InSphere.Center) > InSphere.Radius)
        {
            return BoundCheckResult::Outside;
        }
        else if (Math::Abs(p.Distance(InSphere.Center)) <= InSphere.Radius)
        {
            return BoundCheckResult::Intersect;
        }
    }

    return BoundCheckResult::Inside;
}
구 바운딩 볼륨의 중심 좌표에 모델링 행렬과 뷰 행렬을 곱해 뷰 공간의 좌표로 변환한 후 절두체 컬링 판정에 사용했다.
// 책의 예제인 CK소프트렌더러에서 렌더링 로직을 담당하는 함수
void SoftRenderer::Render3D()
{
    ...

    // 렌더링 로직의 로컬 변수
    const Matrix4x4 vMatrix = mainCamera.GetViewMatrix();
    const Matrix4x4 pMatrix = mainCamera.GetPerspectiveMatrix();
    const Matrix4x4 pvMatrix = mainCamera.GetPerspectiveViewMatrix();

    // 절두체 구축을 위한 투영 행렬의 설정
    Matrix4x4 ptMatrix = pMatrix.Transpose();

    // 절두체를 구성하는 평면의 방정식
    std::array<Plane, 6> frustumPlanes = {
        Plane(-(ptMatrix[3] - ptMatrix[1])), // +Y
        Plane(-(ptMatrix[3] + ptMatrix[1])), // -Y
        Plane(-(ptMatrix[3] - ptMatrix[0])), // +X
        Plane(-(ptMatrix[3] + ptMatrix[0])), // -X
        Plane(-(ptMatrix[3] - ptMatrix[2])), // +Z
        Plane(-(ptMatrix[3] + ptMatrix[2])), // -Z
    };

    // 절두체 선언
    Frustum frustumFromMatrix(frustumPlanes);

    for (auto it = g.SceneBegin(); it != g.SceneEnd(); ++it)
    {
        ...

        // 렌더링에 필요한 게임 오브젝트의 주요 레퍼런스를 얻기
        const Mesh& mesh = g.GetMesh(gameObject.GetMeshKey());
        const TransformComponent& transform = gameObject.GetTransform();
        Matrix4x4 mMatrix = transform.GetModelingMatrix();

        LinearColor finalColor = gameObject.GetColor();

        // 바운딩 영역의 크기를 트랜스폼에 맞게 조정
        Sphere sphereBound = mesh.GetSphereBound();
        sphereBound.Radius *= transform.GetScale().Max();
        sphereBound.Center = (vMatrix * mMatrix * Vector4(sphereBound.Center)).ToVector3();

        // 바운딩 영역을 사용해 절두체 컬링을 구현
        auto checkResult = frustumFromMatrix.CheckBound(sphereBound);
        if (checkResult == BoundCheckResult::Outside)
        {
            // 그리지 않고 건너뜀
            continue;
        }
        else if (checkResult == BoundCheckResult::Intersect)
        {
            // 겹친 게임 오브젝트를 빨간색으로 그림
            finalColor = LinearColor::Red;
        }

        // 최종 행렬 계산
        Matrix4x4 finalMatrix = pvMatrix * mMatrix;

        // 메시 그리기
        DrawMesh3D(mesh, finalMatrix, finalColor);
    }

    ...
}
위에서는 로컬 좌표를 기준으로 생성된 구 바운딩 볼륨의 좌표에 모델링 행렬과 뷰 행렬을 곱해 뷰 공간 좌표로 만들어 사용했다.
하지만 매번 뷰 공간으로 변환하는 작업은 번거롭기 때문에, 이를 개선하는 방법을 생각해본다.
뷰 공간의 좌표에 원근 투영 행렬 P를 곱해 클립 좌표로 변환하는 수식은 다음과 같다.

여기서 뷰 공간의 좌표를 로컬 공간의 좌표로 표현하려면 뷰 행렬 V와 모델링 행렬 M을 추가하면 된다.

P, V, M 세 행렬을 곱한 PVM 행렬 역시 4x4 행렬이므로 행 벡터를 사용해 평면의 방정식을 생성할 수 있고, 이를 통해 만들어진 평면은 로컬 공간의 평면이 된다.
그러면, 구 바운딩 볼륨의 로컬 좌표와 로컬 공간의 평면의 방정식을 이용해 절두체 컬링을 더 효율적으로 수행하는 것이 가능해진다.
// 책의 예제인 CK소프트렌더러에서 렌더링 로직을 담당하는 함수
void SoftRenderer::Render3D()
{
    ...

    // 렌더링 로직의 로컬 변수
    const Matrix4x4 pvMatrix = mainCamera.GetPerspectiveViewMatrix();

    for (auto it = g.SceneBegin(); it != g.SceneEnd(); ++it)
    {
        ...

        // 렌더링에 필요한 게임 오브젝트의 주요 레퍼런스를 얻기
        const Mesh& mesh = g.GetMesh(gameObject.GetMeshKey());
        const TransformComponent& transform = gameObject.GetTransform();

        // 최종 행렬 계산
        Matrix4x4 finalMatrix = pvMatrix * transform.GetModelingMatrix();
        LinearColor finalColor = gameObject.GetColor();

        // 최종 변환 행렬로부터 평면의 방정식과 절두체 생성
        Matrix4x4 finalTransposedMatrix = finalMatrix.Transpose();
        std::array<Plane, 6> frustumPlanesFromMatrix = {
            Plane(-(finalTransposedMatrix[3] - finalTransposedMatrix[1])), // Up
            Plane(-(finalTransposedMatrix[3] + finalTransposedMatrix[1])), // Bottom
            Plane(-(finalTransposedMatrix[3] - finalTransposedMatrix[0])), // Right
            Plane(-(finalTransposedMatrix[3] + finalTransposedMatrix[0])), // Left
            Plane(-(finalTransposedMatrix[3] - finalTransposedMatrix[2])), // Far
            Plane(-(finalTransposedMatrix[3] + finalTransposedMatrix[2])), // Near
        };

        // 절두체 선언
        Frustum frustumFromMatrix(frustumPlanesFromMatrix);

        // 바운딩 영역의 크기를 트랜스폼에 맞게 조정
        Sphere sphereBound = mesh.GetSphereBound();

        // 바운딩 영역을 사용해 절두체 컬링을 구현
        auto checkResult = frustumFromMatrix.CheckBound(sphereBound);
        if (checkResult == BoundCheckResult::Outside)
        {
            continue;
        }
        else if (checkResult == BoundCheckResult::Intersect)
        {
            // 겹친 게임 오브젝트를 빨간색으로 그림
            finalColor = LinearColor::Red;
        }

        // 메시 그리기
        DrawMesh3D(mesh, finalMatrix, finalColor);
    }

    ...
}
이제 가장자리에서 오브젝트가 갑자기 사라지거나 불쑥 생겨나는 현상이 사라지고, 절두체 경계과 겹친 오브젝트들이 빨간색으로 그려진다.

'게임 수학 > 이득우의 게임 수학' 카테고리의 다른 글
| 삼각형 클리핑(Triangle clipping) (0) | 2023.05.24 |
|---|---|
| AABB (Axis Aligned Bounding Box) (0) | 2023.05.23 |
| 원근 투영 행렬로부터 평면의 방정식 만들기 (0) | 2023.05.21 |
| 절두체 컬링(Frustum Culling) (0) | 2023.05.20 |
| 직선의 방정식 (0) | 2023.05.19 |